

|
 |

Want to know what's up with Project 33? This area is updated
monthly to let you know where we're at with the project. The latest Articles are featured
in the What's New? area of this site and are in reverse
chronological order. To follow the build up from "day 1", go to the From the Start link and keep clicking on
"Next Article". To view Articles on a particular subject, use the Search option of this site with the area you wish to explore as your
keyword.
|
|
05/25/04 Update |
Garage Time!
 |
I thought it might be fun to share a little "garage time" with you this month.
This is my brother's pride and joy and it's an inspiration to me and possibly a few others
out there.
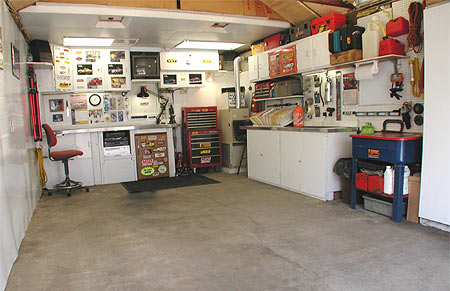
What was once an old dark and dirty single stall
garage has become a bright and organized work space. That in itself isn't such an
incredible feat but if you take into consideration the amount of money spent (or lack of)
and take the time to notice all the features, you'll see what an incredible transformation
it really is.
It's tough to know where to begin... the garage
has everything! It's heated and air conditioned, has a parts washer, a full array of parts
books and manuals, surround sound, DVD, CD, computer with hide-away flat screen monitor
and illuminated keyboard, TV, telephone, intercom, refrigerator, cable, high speed
Internet and two work areas. All in a single stall garage!
There are a lot of hidden features that are
incredibly trick like an automatic parking guide that drops from the ceiling when you open
the door, or the sliding covers over the windows and stereo equipment. The most amazing
thing however is the minimal investment - almost everything was free or salvaged from
somewhere and repaired. When he was a kid his most common line was "Your not using
that anymore, are you?" I'm not so sure that's changed as an adult :)
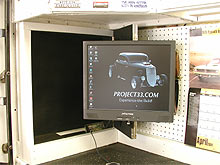 |
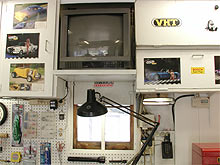
In this photo you can
see the flat screen that flips out of a pocket in the wall. The center-hinged door acts as
the mount - how simple! When it's closed it
looks just like the rest of the pegboard. He laid a piece of pegboard over the top and
sprayed black through the holes. Nice desktop wallpaper bro ;) |
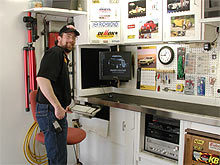
Here's Reade posing by the flip-out keyboard and mouse. The sliding door for the stereo
(under the bench) is in the down position so you can view it. Next to it is a mini
refrigerator - also scavenged for little or nothing.This
is organization to the max. Not an inch of space has been wasted. |
 |
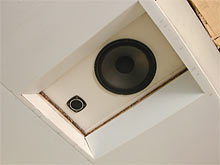 |
Speakers for the surround sound are built into the ceiling to
save room. It sounds awesome!The walls
and ceiling are covered with panels made from a washable plastic coated board that was
donated by a friend. |
The sliding window cover is in the up position in this photo and a nice sized TV sits in
the center of the back wall above it. A rearview mirror from a car works great under the
cupboard as a shaving mirror.The shelf above
the mirror flips down to act as a holder for the automotive manuals inside. |
 |
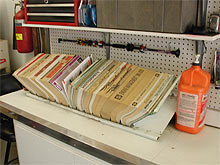 |
More parts books and manuals sit on top of the long "clean area" workbench. The GSS
(Garage Security System ;) blow gun is loaded with darts and hangs above them.Every time I visit I see something else that blows me away (no
pun). It's a fun place to hang out. |
My brother's long and narrow "clean area" work bench
seemed like a really cool idea, so I decided to build one for my garage. These cupboards have been in storage since 1994 when we remodeled the
kitchen in our last house. I never throw anything good away and this seemed like an
excellent use for them. |
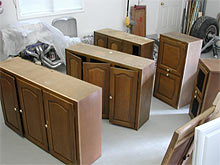 |
I gave them a couple quick coats of primer and paint before
hanging them on the wall. The one on the far right was once a corner cupboard and it
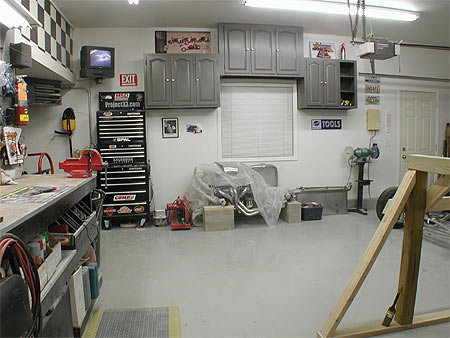
didn't have a door on the right side so I cut it open and made it into open shelves.There will be lights under the cupboards and a 14" deep bench
under it someday soon. The bench will have a lower desk area in front of the window for
the laptop computer and a place to write and draw. The taller side benches will provide a
great place to do projects like dash wiring and small part assembly under good lighting.
There will be enclosed storage underneath. |
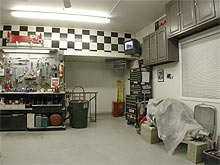 |
Moving my tool chest to the side wall makes the garage seem roomier. I'm also able to
place the garbage can next to the bench. This is where I've had my garbage can in every
shop I've ever had. It's been hard to adjust, so I'm glad to have it back where it belongs
:)The old almond knobs were painted silver as
a finishing touch. |
| Total
investment... $50 for paint and supplies and about six hours of work over two evenings,
and that includes cleaning the garage. I think I'll use the wood from the body cradle to
build the bench after it's no longer needed. Those
of you who are observant will notice that the frame is gone. It went to the paint booth
last Saturday and will be primed this Saturday morning! The body should be joining it in a
week. Bob found a flaw with my bodywork on the firewall and needs to repair it before we
paint. I'll be there with my camera to document the entire process and the materials used.
This time around we get to watch a pro paint it! |
| Until next time - Keep the shiny side up! |
Scooter
|
Past
Updates: |
|